
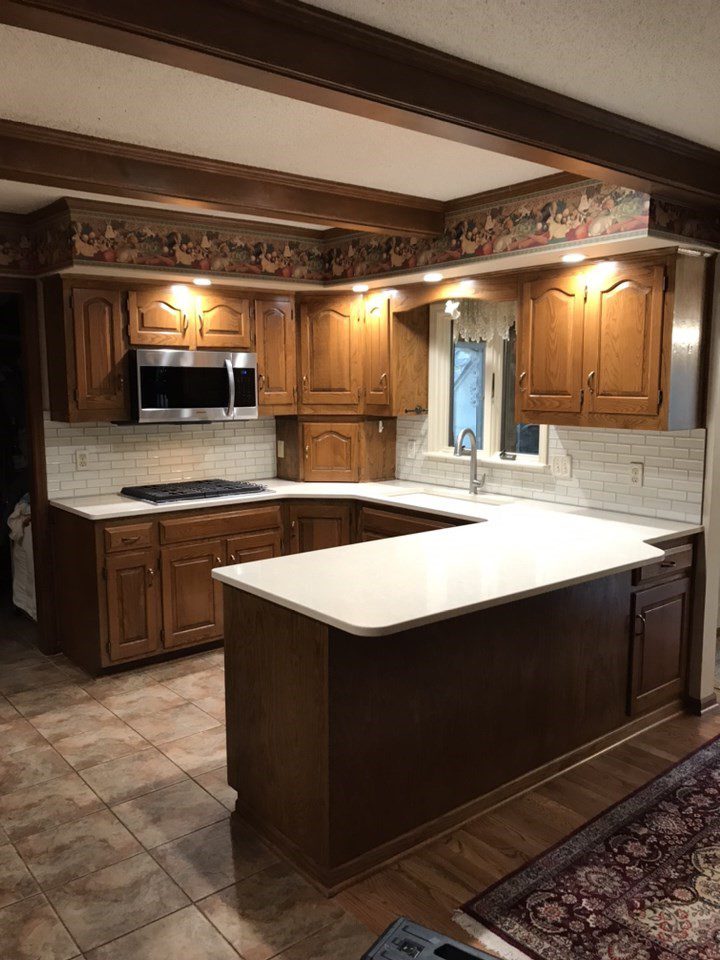
When my wife and I first viewed our current home, we were impressed with a lot of things–the open layout, high ceilings, the big south-facing windows where the sun streams in and pools all day–all things that enchanted us at first sight. As she often does, my wife surprised me with what bothered her most about the house. “I hate that backsplash,” she said more than once. At the time, I was bemused how she could feel so strongly about it; it’s just a mosaic of small glass rectangles, mostly neutral colors with the occasional slate blue. The remodelers put it in because it’s trendy, but she is adamant that classic subway tile would be three times better. While I don’t share the strength of her feelings about it, I’m starting to think a more homogenous backsplash would make our countertops look a little less crowded.
Refresh, Reboot
Maybe you’ve been looking at a distinct design choice you hate, and maybe you’ve been looking at muted creams and browns for years. A set of material upgrades can refresh the whole atmosphere of a space. Our client had been planning a kitchen sprucing for some time, carefully mulling over what design choices she would be happy to live with for years and considering what quality-of-life upgrades she’d like to include. Her household had been waging war against squirrels, recruiting us to repair the damage the critters had done to the house, and she decided it was time for something a bit more fun. She was looking for new countertops, backsplash, and sinks. We gladly took on the job, fitting it in among the other ongoing projects most of us seem to always have.
Establishing floor protection and dust containment is not as easy as we make it look. When you first start, the tape tears all wrong and sticks to your fingers, the floor protection doesn’t cut straight, you over-or underestimate the material you need. If you’re doing your own project, though, please don’t skip this step; a couple of hours will save you days of cleanup and a scratched floor.
Demo
Once we ensured we wouldn’t be doing unintended damage, it was time to remove everything in the kitchen that touched a countertop or backsplash. We had to dismount the microwave, disconnect the stove from the gas and the exhaust, and unfasten the dishwasher. Fortunately, the existing backsplash popped off the wall without even trying to rip the drywall paper, a big win there. The countertop was not to be repurposed, so we pried on it, beat it decisively with hammers, and took it out in eight jagged chunks with surprisingly sharp edges. By the end of the first day, the kitchen was mostly disassembled.

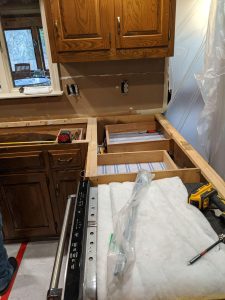
Install
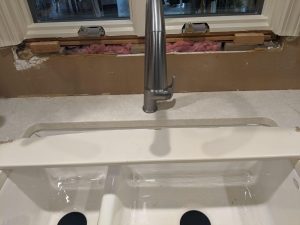
Our experienced lead carpenter, Chris Smith, had the foresight to measure the depth of the new sink and determine that one of the kitchen’s existing drain lines was too high. We could abandon that one, cap it permanently, and run the sinks, disposal, and dishwasher all into the same drain line.

While installing countertops, we discovered the cabinet boxes to be a bit out of level. They were not vertigo-inducing by any means, but one end of the countertop needed a good ½-inch of shims and left a noticeable gap between the countertop and the cabinet box. This was fairly easily remedied with a few sticks of stain-grade scribe, stain and rags, brushable polyurethane, and a pin-nailer.

With the countertop in, we could get to making the kitchen usable again. The stove, exhaust, and dishwasher went back almost painlessly. While the deeper sink required new plumbing, we (well, really just Chris) had predicted and planned for that.
Faucet Install
The new faucet proved a small but unforeseen hiccup. The countertop hole for it was partially underneath the window stool that housed charming plants and decorations, so the stool needed to shrink just slightly. “Oh, so we have to cut it off and then router a new edge?” I asked Chris. “No we pull it out and cut off the other end.” “Oh, that makes more sense.” This trade has taught me the value of considering a variety of approaches.

The stove and dishwasher were in, the window stool resized, and supply and drain lines plumbed; we just needed to set ourselves up for tiling. We protected the new countertops, put on a bit of drywall patching to dry overnight, and called it a day.
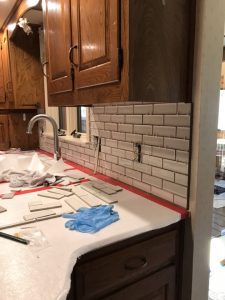
As it was my first time tiling, I was a little intimidated at the prospect of keeping all the pieces square and level, planning the layout so as to minimize awkwardly-sized chunks, and cutting the little ceramic pieces with a saw. Thankfully, Chris is a good teacher who helped me find a feel for various aspects of the process, and we got the whole backsplash up in a day.
Voila
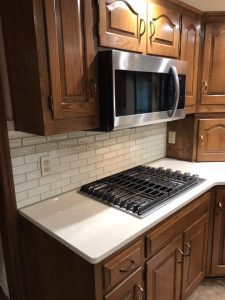
Our client chose a 2×6 ceramic tile with a lot of character. The soft white finish is an almost iridescent gloss. Ivory grout avoids the stark grid layout of dark grey lines on white; it works with the concavity of the tiles to give the wall a subtle depth. The enamel of the cast iron sink matches beautifully the color and sheen of the tile work. The previous polymer countertops had served their purpose well; they’d been durable and low maintenance. Modern technology in material engineering offers even nicer options. The new countertop is comprised of quartz mixed with resins for durability. It offers the longevity of a petroleum product (think how many times you’ve heard that plastic takes centuries to degrade) with the feel and sheen of polished stone.
Fabulous Faucet
My personal favorite touch is the touch-free water faucet. For all our innovations, there are still those dishes that just don’t clean up in the automatic washer. To clean those under your regular faucet, you’ve got to turn the tap on and off, every time it’s either too hot for your hands or too cool to rinse well, you get soapy water all over the place, it’s just a regular old mess. With this faucet, you set the flow and the temperature, wave your hand under the crook of the faucet, and the water stops. Wave again, water flows. I’d say it’s magic, but the electrical components and the extra plumbing indicate it’s probably just good tech.


Pulling the masking and completing the cleanup greeted us with a view of the fruits of our labor. With its lighter colors and higher sheens, the refreshed kitchen is brighter. It also still contributes perfectly to the soft, warm aesthetic of the house.
This minor makeover brought a new light to the kitchen. It added some key functionality in the form of a touchless faucet. Demolition and installation went off with relatively few hitches. Our clients, very accommodating, were also pleasant conversationalists. The project was a pleasure to perform and we look forward to continuing work for these clients, their referrals, and anyone in search of a home repair or refresh.